欢迎大家学习我们的TensorFlow对象检测API系列的第9部分。首先,您可以在我的GitHub页面上下载代码。本教程与以前的教程略有不同。GitHub
在第8部分中,我告诉大家我将使用python多处理来使代码与其他进程并行工作。所以我花了几个小时学习如何使用多处理(我以前没有用过它)。
因此,我复制了第二个教程中的全部代码,并删除了Screen_recordPIL和Screen_Grab函数。仅保留为使用Screen_recordMSS函数。这个功能我们可以分为抓取屏幕和显示抓取的屏幕两个部分。因此,这意味着我们将需要创建两个进程。
首先,我将整个代码分为两部分;第一部分我们将调用GRABMSS_SCREEN。接下来,我们需要将整个代码放入WHILE循环中反复运行。有了屏幕后,我们调用q.put_nowait(Img)命令,将图像放入共享队列,并通过下面的q.join()行说明等待,因为图像将被复制到队列中。
def GRABMSS_screen(q):
    while True:
        # Get raw pixels from the screen, save it to a Numpy array
        img = numpy.array(sct.grab(monitor))
        # To get real color we do this:
        #img = cv2.cvtColor(img, cv2.COLOR_BGR2RGB)
        q.put_nowait(img)
        q.join()
第二个函数我们将调用SHOWMSS_SCREEN。之后,我们做和以前一样的事情,显示抓取的图像并测量FPS。此函数也将在WHILE循环中运行,我们总是检查队列是否为空。当队列中有东西时,我们调用q.get_NoWait()命令,该命令从队列中获取所有内容,并且使用q.task_Done()我们将锁定进程,如果我们没有完成收集所有数据,则不会中断队列。
def SHOWMSS_screen(q):
    global fps, start_time
    while True:
        if not q.empty():
            img = q.get_nowait()
            q.task_done()
            # To get real color we do this:
            img = cv2.cvtColor(img, cv2.COLOR_BGR2RGB)
            # Display the picture
            cv2.imshow(title, cv2.cvtColor(img, cv2.COLOR_BGR2RGB))
            # Display the picture in grayscale
            fps+=1
            TIME = time.time() - start_time
            if (TIME) >= display_time :
                print("FPS: ", fps / (TIME))
                fps = 0
                start_time = time.time()
            # Press "q" to quit
            if cv2.waitKey(25) & 0xFF == ord("q"):
                cv2.destroyAllWindows()
                break
现在,我们有两个不同的函数,我们将在并行进程中使用它们。
如果我们想在多处理中运行我们的代码,我们必须以if name==“main”:开头,并从命令提示符下运行python脚本;否则,如果我们从python shell运行它,就不会在这里得到测量FPS所需的任何打印结果。因此,我们完整的第三部分代码如下所示:
if __name__=="__main__":
    # Queue
    q = multiprocessing.JoinableQueue()

    # creating new processes
    p1 = multiprocessing.Process(target=GRABMSS_screen, args=(q, ))
    p2 = multiprocessing.Process(target=SHOWMSS_screen, args=(q, ))

    # starting our processes
    p1.start()
p2.start()有关python多处理和队列的更多信息,您可以通过此链接了解。短码说明:我们从创建一个Chared队列开始。link
# Queue
q = multiprocessing.JoinableQueue()
我们正在使用以下几行创建p1和p2进程,它们将在后台运行。p1函数将调用GRABMSS_Screen()函数,p2将调用SHOWMSS_Screen()函数。作为这些函数的自变量,我们必须给出自变量,我们在那里给q。
# creating new processes
p1 = multiprocessing.Process(target=GRABMSS_screen, args=(q, ))
p2 = multiprocessing.Process(target=SHOWMSS_screen, args=(q, ))
最后一步是开始我们的流程。在这些命令之后,我们的抓取屏幕功能将在后台运行。
# starting our processes
p1.start()
p2.start()
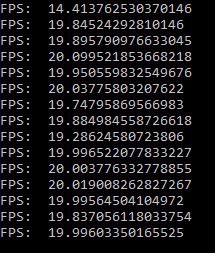
为了进行比较,我在没有多处理和使用多处理的情况下运行了旧代码。以下是未进行多处理的结果:
我们可以看到平均每秒19-20次。以下是多处理的结果:
具有多处理管道的抓取屏
Rokas Balsys于2018年12月18日更新
下面是一个类似的代码,其中我使用多处理管道在进程之间进行“一对一”通信:
import multiprocessing
from multiprocessing import Pipe
import time
import cv2
import mss
import numpy as np
import datetime

title = "FPS benchmark"
start_time = time.time()
display_time = 2 # displays the frame rate every 2 second
fps = 0
sct = mss.mss()
# Set monitor size to capture
monitor = {"top": 40, "left": 0, "width": 800, "height": 640}

def GRABMSS_screen(p_input):
    while True:
        #Grab screen image
        img = np.array(sct.grab(monitor))
        img = cv2.cvtColor(img, cv2.COLOR_BGR2RGB)
        img = cv2.cvtColor(img, cv2.COLOR_BGR2RGB)

        # Put image from pipe
        p_input.send(img)

def SHOWMSS_screen(p_output):
    global fps, start_time
    while True:
        # Get image from pipe
        img = p_output.recv()

        # Display the picture
        cv2.imshow(title, img)

        # Calculate FPS
        fps+=1
        TIME = time.time() - start_time
        if (TIME) >= display_time :
            print("FPS: ", fps / (TIME))
            fps = 0
            start_time = time.time()

        # Press "q" to quit
        if cv2.waitKey(25) & 0xFF == ord("q"):
            cv2.destroyAllWindows()
            break


if __name__=="__main__":
    # Pipes
    p_output, p_input = Pipe()

    # creating new processes
    p1 = multiprocessing.Process(target=GRABMSS_screen, args=(p_input,))
    p2 = multiprocessing.Process(target=SHOWMSS_screen, args=(p_output,))

    # starting our processes
    p1.start()
    p2.start()
我们可以看到,平均速度约为32 FPS。所以我们的最终结果是我们的抓取屏幕改进了大约50%。我想要改进得更多,但目前我还没有办法做到这一点。不管怎么说,结果比以前好多了!接下来,我将尝试将其与CSGO对象检测代码集成。
最初发表于https://pylessons.com/Tensorflow-object-detection-grab-screen-multiprocessinghttps://pylessons.com/Tensorflow-object-detection-grab-screen-multiprocessing
原创文章,作者:fendouai,如若转载,请注明出处:https://panchuang.net/2021/07/08/%e5%85%b7%e6%9c%89%e5%a4%9a%e5%a4%84%e7%90%86%e5%8a%9f%e8%83%bd%e7%9a%84tensorflow%e7%89%a9%e4%bd%93%e6%a3%80%e6%b5%8b%e6%8a%93%e5%8f%96%e5%b1%8f%e5%b9%95-2/

