TensorFlow 卷积神经网络手写数字识别数据集介绍
本文是全系列中第4 / 23篇:TensorFlow 从入门到精通
- Tensorflow 介绍和安装
- 【干货】史上最全的Tensorflow学习资源汇总
- 文末福利|一文上手TensorFlow2.0(一)
- TensorFlow 卷积神经网络手写数字识别数据集介绍
- 特征工程
- 一文上手最新TensorFlow2.0系列(二)
- 深度学习之激活函数
- Tensorflow实现MNIST手写数字识别
- 一文上手Tensorflow2.0之tf.keras|三
- 卷积神经网络概述
- 损失函数综述
- 一文上手Tensorflow2.0(四)
- TensorFlow 一步一步实现卷积神经网络
- Tensorboard 详解(上篇)
- 深度学习发展史
- Tensorflow从入门到精通之——Tensorflow基本操作
- Tensorboard详解(下篇)
- 卷积的发展历程,原理和基于 TensorFlow 的实现
- 五大经典卷积神经网络介绍:LeNet / AlexNet / GoogLeNet / VGGNet/ ResNet
- TensorFlow 多GPU使用详解
- 一文彻底搞懂BP算法:原理推导+数据演示+项目实战(上篇)
- TensorFlow 实战卷积神经网络之 LeNet
- 深度学习之视频人脸识别系列二:人脸检测与对齐
手写数字识别
接下来将会以 MNIST 数据集为例,使用卷积层和池化层,实现一个卷积神经网络来进行手写数字识别,并输出卷积和池化效果。
数据准备
- MNIST 数据集下载
MNIST 数据集可以从 THE MNIST DATABASE of handwritten digits 的网站直接下载。
网址:http://yann.lecun.com/exdb/mnist/
train-images-idx3-ubyte.gz: 训练集图片
train-labels-idx1-ubyte.gz: 训练集列标
t10k-images-idx3-ubyte.gz: 测试集图片
t10k-labels-idx1-ubyte.gz: 测试集列标
TensorFlow 有加载 MNIST 数据库相关的模块,可以在程序运行时直接加载。
代码如下:
from tensorflow.examples.tutorials.mnist import input_data
import matplotlib.pyplot as pyplot

#引入 MNIST 数据集
mnist = input_data.read_data_sets("/tmp/data/", one_hot=False)

#选取训练集中的第 1 个图像的矩阵
mnist_one=mnist.train.images[0]

#输出图片的维度,结果是:(784,)
print(mnist_one.shape)

#因为原始的数据是长度是 784 向量,需要转换成 28*28 的矩阵。
mnist_one_image=mnist_one.reshape((28,28))

#输出矩阵的维度
print(mnist_one_image.shape)

#使用 matplotlib 输出为图片
pyplot.imshow(mnist_one_image)

pyplot.show()
代码的输出依次是:
1.单个手写数字图片的维度:
(784,)
2.转化为二维矩阵之后的打印结果:
(28, 28)
3.使用 matplotlib 输出为图片

模型实现
TensorFlow conv2d 函数介绍:
tf.nn.conv2d(x, W, strides, padding=’SAME’)
针对输入的 4 维数据 x 计算 2 维卷积。
参数 x:
4 维张量,每一个维度分别是 batch,in_height,in_height,in_channels。
[batch, in_height, in_width, in_channels]
灰度图像只有 2 维来表示每一个像素的值,彩色图像每一个像素点有 3 通道的 RGB 值,所以一个彩色图片转化成张量后是 3 维的,分别是长度,宽度,颜色通道数。又因为每一次训练都是训练都是输入很多张图片,所以,多个 3 维张量组合在一起变成了 4 维张量。
参数 w:
过滤器,因为是二维卷积,所以它的维度是:
[filter_height, filter_width, in_channels, out_channels]
与参数 x 对应,前 3 个参数分别是对应 x 的 filter_height, filter_width, in_channels,最后一个参数是过滤器的输出通道数量。
参数 strides:
1 维长度为 4 的张量,对应参数 x 的 4 个维度上的步长。
参数 padding:
边缘填充方式,主要是 “SAME”, “VALID”,一般使用 “SAME”。
卷积层简单封装
# 池化操作
def conv2d(x, W, b, strides=1):
# Conv2D wrapper, with bias and relu activation
x = tf.nn.conv2d(x, W, strides=[1, strides, strides, 1], padding='SAME')
x = tf.nn.bias_add(x, b)
return tf.nn.relu(x)
TensorFlow max_pool 函数介绍:
tf.nn.max_pool(x, ksize, strides ,padding)
参数 x:
和 conv2d 的参数 x 相同,是一个 4 维张量,每一个维度分别代表 batch,in_height,in_height,in_channels。
参数 ksize:
池化核的大小,是一个 1 维长度为 4 的张量,对应参数 x 的 4 个维度上的池化大小。
参数 strides:
1 维长度为 4 的张量,对应参数 x 的 4 个维度上的步长。
参数 padding:
边缘填充方式,主要是 “SAME”, “VALID”,一般使用 “SAME”。
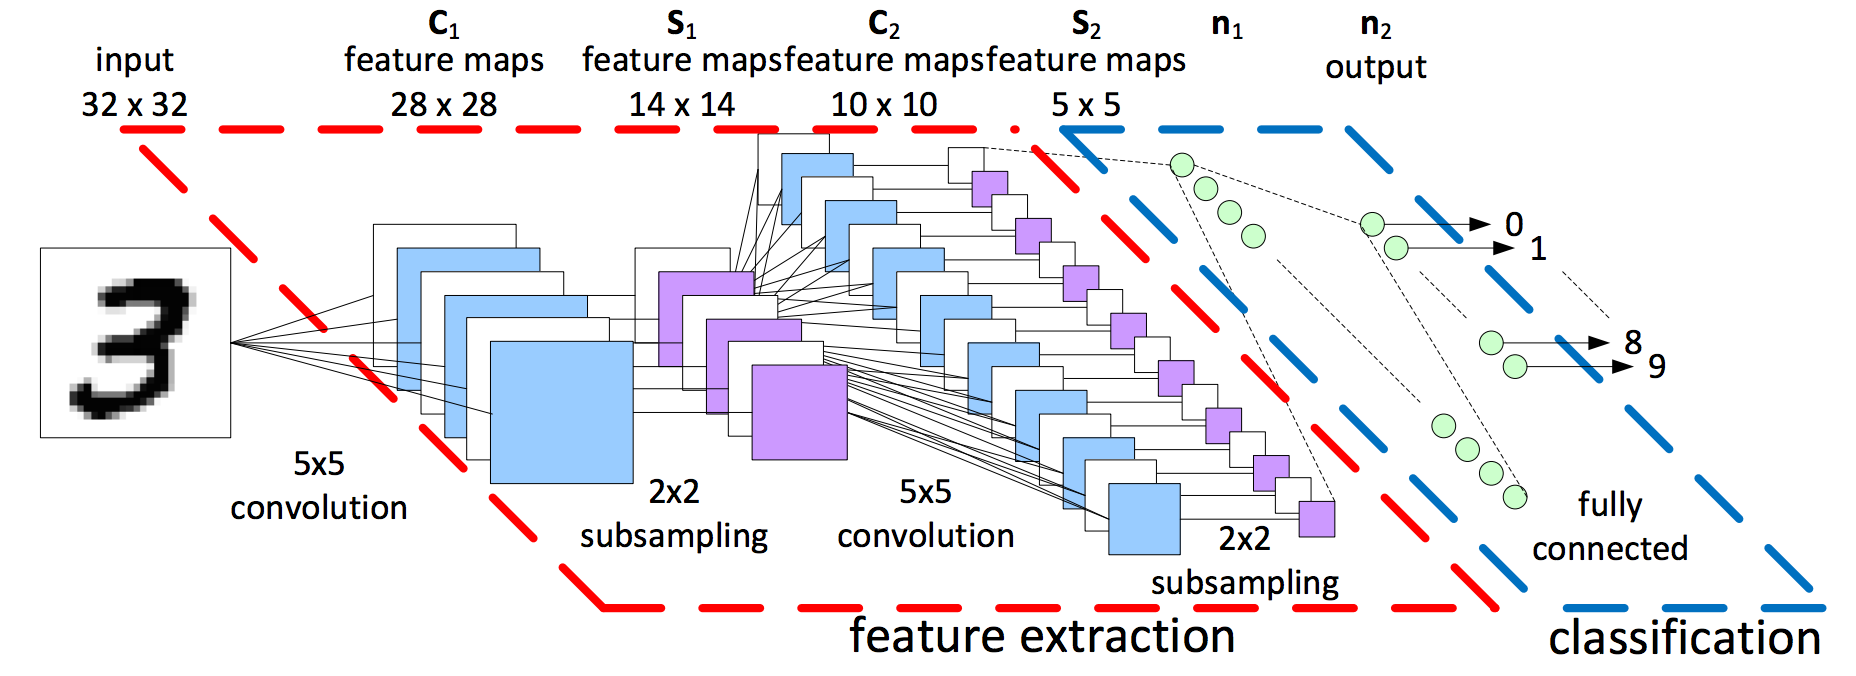
接下来将会使用 TensorFlow 实现以下结构的卷积神经网络:

下一篇文章,将会用 TensorFlow 实现这个卷积神经网络。
原创文章,作者:fendouai,如若转载,请注明出处:https://panchuang.net/2018/03/26/tensorflow-mnist/

