
作者|GUEST
编译|VK
来源|Analytics Vidhya
在PyCharm和Visual Studio代码上支持CUDA
介绍
如果你没有经验,建立一个开发环境是不容易的,特别是如果你想学习的技术很多。
本教程旨在向你展示如何在PyCharm或Visual Studio代码中设置一个基于Docker的Python开发环境,并支持CUDA。
免责声明
-
在写这篇文章的时候,我无法在Windows10 家庭版中使用Docker内部的CUDA(即使是内部版本),所以本教程是在考虑Linux的情况下实现的,尽管基本上没有什么是特定于平台的。
-
只有在专业版上才能使用Docker作为PyCharm的远程Python解释器。
-
我假设你已经在你的机器上安装了Docker。
-
我假设你已经在你的机器上安装了CUDA。如果你仍在设置你的Linux机器,并且你不愿意研究太多,我通常推荐Pop操作系统(https://pop.system76.com/)。在该文中(https://support.system76.com/articles/cuda/),你可以找到如何在他们的平台上非常容易地设置CUDA和cuDNN。文章还提供了在Ubuntu上使用他们的包的说明。
项目结构
在本教程中,我使用了一个只有3个文件的玩具项目:
生成容器的Dockerfile。
requirements.txt包含项目依赖项的文件。
run.py包含一些要运行的代码的文件。显然,你的个人项目很可能更复杂,你可以使用不同的方法来管理依赖关系,你也可以使用docker-compose.yaml但为了实现我的例子这会毫无意义引入复杂性。
Dockerfile文件
对于一篇更关注Docker和Dockerfiles的文章,我推荐Docker初学者指南:https://medium.com/codingthesmartway-com-blog/docker-beginners-guide-part-1-images-containers-6f3507fffc98
下面是我们的Dockerfile和一个简短的注释
FROM nvidia/cuda:10.2-devel

# 地址: https://github.com/ContinuumIO/docker-images/blob/master/miniconda3/debian/Dockerfile

ENV PATH /opt/conda/bin:$PATH

RUN apt-get update --fix-missing && \
    apt-get install -y wget bzip2 ca-certificates libglib2.0-0 libxext6 libsm6 libxrender1 git mercurial subversion && \
    apt-get clean

RUN wget --quiet https://repo.anaconda.com/miniconda/Miniconda3-latest-Linux-x86_64.sh -O ~/miniconda.sh && \
    /bin/bash ~/miniconda.sh -b -p /opt/conda && \
    rm ~/miniconda.sh && \
    /opt/conda/bin/conda clean -tipsy && \
    ln -s /opt/conda/etc/profile.d/conda.sh /etc/profile.d/conda.sh && \
    echo ". /opt/conda/etc/profile.d/conda.sh" >> ~/.bashrc && \
    echo "conda activate base" >> ~/.bashrc && \
    find /opt/conda/ -follow -type f -name '*.a' -delete && \
    find /opt/conda/ -follow -type f -name '*.js.map' -delete && \
    /opt/conda/bin/conda clean -afy

# 项目设置

WORKDIR /code

COPY requirements.txt .

RUN pip install -r requirements.txt

COPY . .

CMD ["python", "./run.py"]通俗地说,Dockerfile描述了生成Docker镜像的过程,该镜像随后用于创建Docker容器。这个Dockerfile文件建立在nvidia/cuda:10.2-devel,镜像由NVIDIA直接在DockerHub中提供:https://hub.docker.com/r/nvidia/cuda。
nvidia/cuda:10.2-devel是已经安装了CUDA10.2工具包的开发镜像
现在你只需要安装Python开发所需的东西并设置我们的项目。
在Dockerfile的中间部分有一个Miniconda3安装。我决定使用Miniconda而不是仅仅使用Python,因为它是我大多数项目的首选平台。
我们没有利用Miniconda的任何功能,所以这有点过头了。将Miniconda替换成Dockerfile中的Python,这是留给读者的一个练习(不要惊慌,只需使用与新的Ubuntu设备相同的命令)。
最后一节是关于项目设置的,我们只是安装依赖项,复制镜像工作目录中的所有文件,并选择在没有指定命令的情况下调用docker run时启动的命令。
要构建Docker镜像,只需使用你选择的shell导航到包含Dockerfile的路径并运行:
docker build -t <image_name> .这将生成配置描述的Docker镜像,并将其命名为image_name。如果在名称中没有指定标记,则使用最新的作为默认值。要指定标记,只需在冒号后写入。
在本教程的其余部分中,我将使用pytorch-development-box这个名称。
requirements.txt
我只使用Pytorch和Torchvision作为这个项目的依赖项。我经常使用这些包,我会使用他们的CUDA可用性方法来检查是否一切正常。所以我的requirements.txt是:
torch
torchvision
run.py
我的Python文件非常简单,我只是检查CUDA是否可用。
import torch.cuda

if torch.cuda.is_available():
    print("CUDA is available :D")
else:
    print("CUDA isn't available :(")
设置PyCharm
只有在PyCharm Professional上才能使用Docker的远程Python解释器。那么,让我们看看如何设置它。
构建好Docker镜像并在PyCharm中打开项目文件夹后,导航到File > Settings > Project > Python Interpreter。
你应该看到这样的画面:

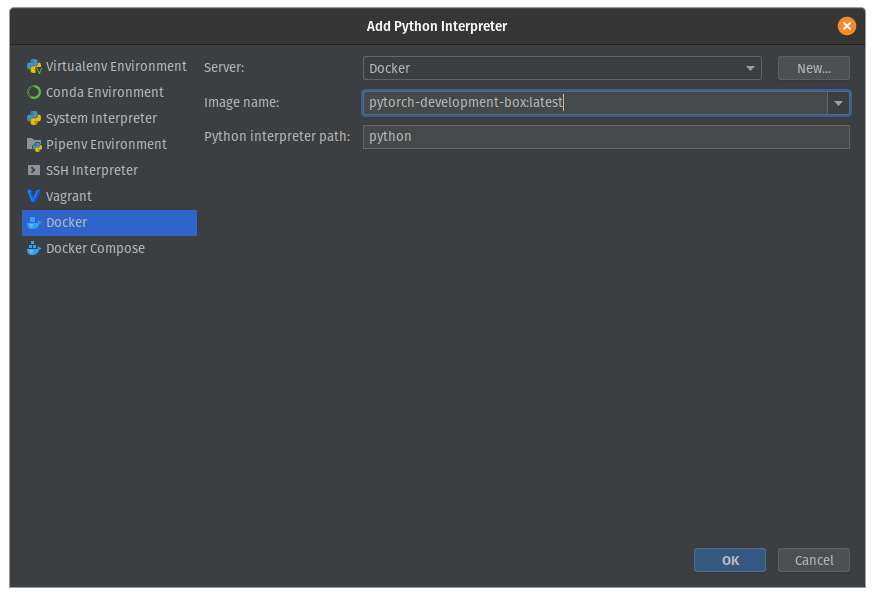
现在单击右上角附近的小齿轮并添加一个新的Python解释器。
在这里,你需要选择Docker并在名为image name的下拉菜单中选择之前选择的镜像名称,如下所示:
确认此配置后,请等待索引完成,然后尝试运行run.py.
CUDA isn't available :(在这一点上,我们没有配置让Docker使用GPU,但我们可以快速修复它。
打开自动生成的运行/调试配置,并在Docker容器设置的末尾添加--gpus all。
你应该得到这样的结果:
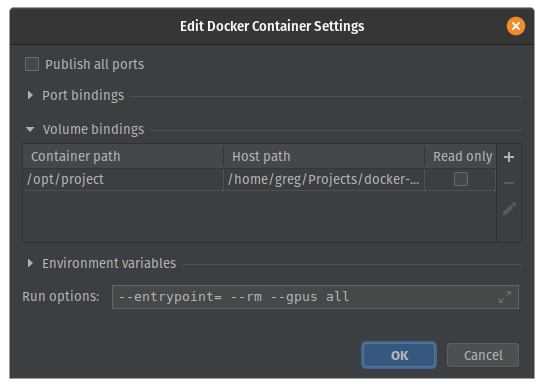
确认此配置并运行它。CUDA结果现在可用!
设置Visual Studio代码
我将依靠新的Visual Studio代码的远程开发扩展来设置通过Docker的开发。
第一步是安装远程开发扩展包并打开项目文件夹:https://marketplace.visualstudio.com/items?itemName=ms-vscode-remote.vscode-remote-extensionpack
使用VisualStudio palette中的“Add Development Container Configuration Files”命令。
选择使用自己的Dockerfile。
此时devcontainer.json文件将被创建到一个.devcontainer目录中,如下所示:
// For format details, see https://aka.ms/vscode-remote/devcontainer.json or this file's README at:
// https://github.com/microsoft/vscode-dev-containers/tree/v0.128.0/containers/docker-existing-dockerfile
{
    "name": "Existing Dockerfile",

    // Sets the run context to one level up instead of the .devcontainer folder.
    "context": "..",

    // Update the 'dockerFile' property if you aren't using the standard 'Dockerfile' filename.
    "dockerFile": "../Dockerfile",

    // Set *default* container specific settings.json values on container create.
    "settings": {
        "terminal.integrated.shell.linux": null
    },

    // Add the IDs of extensions you want installed when the container is created.
    "extensions": []

    // Use 'forwardPorts' to make a list of ports inside the container available locally.
    // "forwardPorts": [],

    // Uncomment the next line to run commands after the container is created - for example installing curl.
    // "postCreateCommand": "apt-get update && apt-get install -y curl",

    // Uncomment when using a ptrace-based debugger like C++, Go, and Rust
    // "runArgs": [ "--cap-add=SYS_PTRACE", "--security-opt", "seccomp=unconfined" ],

    // Uncomment to use the Docker CLI from inside the container. See https://aka.ms/vscode-remote/samples/docker-from-docker.
    // "mounts": [ "source=/var/run/docker.sock,target=/var/run/docker.sock,type=bind" ],

    // Uncomment to connect as a non-root user. See https://aka.ms/vscode-remote/containers/non-root.
    // "remoteUser": "vscode"
}
将弹出一个提示,要求在容器中重新打开该文件夹。
在此之前,我们只需要选择一些在容器中开发时使用的扩展。
转到Extensions选项卡,浏览你需要的扩展,你可以右键单击并选择Add to devcontainer。将它们添加到配置中。
现在我们只需要添加一个runArgs键来启用GPU,我们就可以开始开发了。
减去注释,你应该得到这样的结果:
{
    "name": "Existing Dockerfile",
    "context": "..",
    "dockerFile": "../Dockerfile",
    "settings": {
        "terminal.integrated.shell.linux": null
    },
    "extensions": [
        "ms-python.python"
    ],
    // This was added!
    "runArgs": [
        "--gpus=all"
    ]
}
现在从命令面板,我们可以重建和重新打开容器
结论
现在你已经在IDE中配置了一个非常基本的开发环境,它基于你自己的Docker镜像,所有这些都支持GPU。
欢迎关注磐创AI博客站:
http://panchuang.net/
sklearn机器学习中文官方文档:
http://sklearn123.com/
欢迎关注磐创博客资源汇总站:
http://docs.panchuang.net/
原创文章,作者:磐石,如若转载,请注明出处:https://panchuang.net/2020/10/19/%e5%9f%ba%e4%ba%8edocker%e7%9a%84python%e5%bc%80%e5%8f%91/
