
这是CS:GO对象检测教程的第三部分。在这一部分中,我们将合并来自第一个教程的Jupiter API代码和来自第二个教程的代码,在该教程中,我们测试了三种不同的屏幕抓取方式。您可以从GitHub存储库下载完整的代码。GitHub
首先,我们将™首先修改笔记本,将其转换为.py文件。如果你想把它记在笔记本里,那也可以™。要进行转换,您可以转到“文件”>“下载为”>“python文件”。一旦欧元™完成,我们将注释掉我们不需要的代码行(™™)。
一旦有了转换后的对象检测文件,请转到TensorFlow安装文件夹:Research\object_Detection\data并抓取mscoco_label_map.pbtxt文件,将其放入您的工作目录中。
接下来,您应该从这里下载预先训练好的模型,我使用的是FASTER_rcnn_INSTIMATION_v2_coco,所以我建议您至少在开始时使用相同的模型。获取Freeze_Inference_raph.pb文件并将其传输到您的本地工作存储库。here
因此,我们从导入Time、CV2、MSS库开始。如果您没有™,请在继续操作之前安装它们。
我个人导入了一行来禁用CUDA设备,因为我想在CPU上运行此示例。毕竟,运行TensorFlow-GPU需要在后端启动更多时间。
os.environ['CUDA_VISIBLE_DEVICES'] = '-1'然后我们不需要导入tarfile和™,因为我们没有处理这些文件,所以我们现在将它们注释掉。更进一步,我们注释#from matplotlib import pylot as PLT和#from PIL import Image line,因为我们正在按照自己的方式行事。
接下来,我将从我的第二个教程中导入几行代码来抓屏和测量FPS:
# title of our window
title = "FPS benchmark"
# set start time to current time
start_time = time.time()
# displays the frame rate every 2 second
display_time = 2
# Set primarry FPS to 0
fps = 0
# Load mss library as sct
sct = mss.mss()
# Set monitor size to capture to MSS
monitor = {"top": 40, "left": 0, "width": 800, "height": 640}
因为我们不再使用笔记本,所以我们不使用和这些行:
#sys.path.append("..")

#if StrictVersion(tf.__version__) < StrictVersion('1.9.0'):
#  raise ImportError('Please upgrade your TensorFlow installation to v1.9.* or later!')
我们没有使用matplotlib来显示图像,因此我们对用于该操作的行进行注释:
#get_ipython().run_line_magic('matplotlib', 'inline')在转到实际代码之前,有两行导入:
from utils import label_map_util
from utils import visualization_utils as vis_util
但是如果您试图这样使用它们,您会得到一个错误,所以添加object_Detection。在实用程序之前,就像这样:
from object_detection.utils import label_map_util
from object_detection.utils import visualization_utils as vis_util
接下来是指向路径的链接,如果您希望将所有内容放在同一个文件夹中,就像在我的教程中一样,请对所有这些行进行注释:
# What model to download.
MODEL_NAME = 'ssd_mobilenet_v1_coco_2017_11_17'
MODEL_FILE = MODEL_NAME + '.tar.gz'
DOWNLOAD_BASE = 'http://download.tensorflow.org/models/object_detection/'

# Path to frozen detection graph. This is the actual model that is used for the object detection.
PATH_TO_FROZEN_GRAPH = MODEL_NAME + '/frozen_inference_graph.pb'

# List of the strings that is used to add correct label for each box.
PATH_TO_LABELS = os.path.join('data', 'mscoco_label_map.pbtxt')
并将它们替换为我使用的路径行(不要忘记添加NUMCLASSES=80行)(™不要忘记添加NUMCLASSES=80行)
MODEL_NAME = 'inference_graph'
PATH_TO_FROZEN_GRAPH = 'frozen_inference_graph.pb'
PATH_TO_LABELS = 'mscoco_label_map.pbtxt'
NUM_CLASSES = 99
接下来,您可以对整个[6]部分进行评论,因为我们不会使用它们-EURO™t use:
#opener = urllib.request.URLopener()
#opener.retrieve(DOWNLOAD_BASE + MODEL_FILE, MODEL_FILE)
#tar_file = tarfile.open(MODEL_FILE)
#for file in tar_file.getmembers():
#  file_name = os.path.basename(file.name)
#  if 'frozen_inference_graph.pb' in file_name:
#    tar_file.extract(file, os.getcwd())
接下来,在Detection_graph代码前增加3行:LABEL_MAP、CATEGORY、CATEGORY_INDEX行:
label_map = label_map_util.load_labelmap(PATH_TO_LABELS)
categories = label_map_util.convert_label_map_to_categories(label_map, max_num_classes=NUM_CLASSES, use_display_name=True)
category_index = label_map_util.create_category_index(categories)
并在第[8]部分注释或删除CATEGORY_INDEX行:
category_index = label_map_util.create_category_index_from_labelmap(PATH_TO_LABELS, use_display_name=True)注释Part[7]中将图像加载到NumPy数组的所有行:
#def load_image_into_numpy_array(image):
#  (im_width, im_height) = image.size
#  return np.array(image.getdata()).reshape(
#      (im_height, im_width, 3)).astype(np.uint8)
接下来,您可以删除PATH_TO_TEST_IMAGE_DIR、TEST_IMAGE_PATHS和IMAGE_SIZE行,但是如果您保留它们,™不会影响我们的代码:
PATH_TO_TEST_IMAGES_DIR = 'test_images'
TEST_IMAGE_PATHS = [ os.path.join(PATH_TO_TEST_IMAGES_DIR, 'image{}.jpg'.format(i)) for i in range(1, 3) ]
IMAGE_SIZE = (12, 8)
在代码末尾,为了不犯任何错误,可以将所有[12]个挡路代码替换为这个代码:
with detection_graph.as_default():
  with tf.Session(graph=detection_graph) as sess:
    while True:
      # Get raw pixels from the screen, save it to a Numpy array
      image_np = np.array(sct.grab(monitor))
      # to ger real color we do this:
      image_np = cv2.cvtColor(image_np, cv2.COLOR_BGR2RGB)
      #image = Image.open(image_path)
      # the array based representation of the image will be used later in order to prepare the
      # result image with boxes and labels on it.
      #image_np = load_image_into_numpy_array(image)
      # Expand dimensions since the model expects images to have shape: [1, None, None, 3]
      image_np_expanded = np.expand_dims(image_np, axis=0)
      # Actual detection.
      output_dict = run_inference_for_single_image(image_np, detection_graph)
      # Visualization of the results of a detection.
      vis_util.visualize_boxes_and_labels_on_image_array(
          image_np,
          output_dict['detection_boxes'],
          output_dict['detection_classes'],
          output_dict['detection_scores'],
          category_index,
          instance_masks=output_dict.get('detection_masks'),
          use_normalized_coordinates=True,
          line_thickness=8)
      #plt.figure(figsize=IMAGE_SIZE)
      #plt.imshow(image_np)
      cv2.imshow(title, cv2.cvtColor(image_np, cv2.COLOR_BGR2RGB))
      fps+=1
      TIME = time.time() - start_time
      if (TIME) >= display_time :
        print("FPS: ", fps / (TIME))
        fps = 0
        start_time = time.time()
      # Press "q" to quit
      if cv2.waitKey(25) & 0xFF == ord("q"):
        cv2.destroyAllWindows()
        break
所以我试着在一张图片上使用这种慢速物体检测方法,在这张图片上,你可以看到一群人走过街道:
这是使用TensorFlow CPU版本每秒帧数的结果。平均而言,每秒接收一帧大约需要7秒。因此,如果我们想要将其用于实时目的,就不可能做一些有用的事情。所以我们需要让它工作得更快。我们将在文本教程中完成此操作。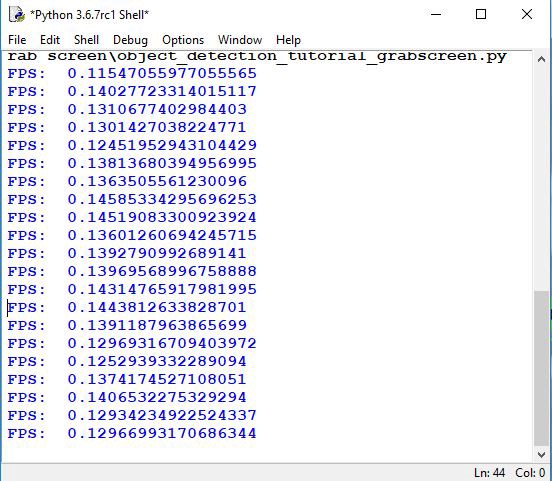
在本教程中,我们学习了如何从对象检测API中导出代码,并对其进行修改以在我们的python shell中工作。在这里,我们使用了一个预先训练好的模型来检测对象,但是现在我们的模型工作起来非常慢,所以在下一个教程中,我们将清理我们的代码,使我们的代码工作得更快。
最初发表于https://pylessons.com/Tensorflow-object-detection-merged-grab-screenhttps://pylessons.com/Tensorflow-object-detection-merged-grab-screen
原创文章,作者:fendouai,如若转载,请注明出处:https://panchuang.net/2021/07/07/%e4%b8%8e%e6%8a%93%e5%8f%96%e5%b1%8f%e5%b9%95%e5%90%88%e5%b9%b6%e7%9a%84%e5%af%b9%e8%b1%a1%e6%a3%80%e6%b5%8b%e6%95%99%e7%a8%8b/
