在我之前的视频教程中,我们正在进行循序渐进的训练配置,并且我们开始训练验证码检测模型。要继续,我们需要下载前面的教程代码,可以从该链接下载。我告诉过您应该训练一个40-60k步的模型,但是我没有展示如何跟踪训练过程,所以这里是在训练过程中打开张量板的命令:this link.
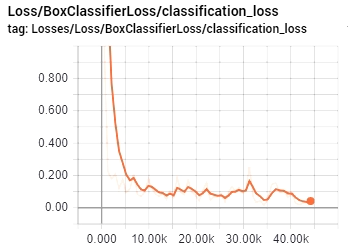
C:\TensorFlow\research\object_detection>tensorboard --logdir=CAPTCHA_training_dir因此,您应该始终检查您的localhost:6006,同时运行拉力板,并训练您的模型,直到您看到您的损失曲线不再变得更低。所以我在训练我的验证码检测模型44k步,正如你从我的损失图中看到的,在40k步,它不会变低。所以,在这种情况下,再训练这个模型是没有用的。最好是获得更多的训练数据,并用新的数据进行训练。在这种情况下,它会更准确。这是我的亏损图表:
最后,在此损失图之后,我们导出我们的模型冻结推理图。我不深入细节,如果您需要更详细的解释,请查看我的YouTube视频。因此,要导出我们的模型,请使用以下命令(将model.ckpt-XXXX中的XXXX更改为您训练过的型号):
python export_inference_graph.py --input_type image_tensor --pipeline_config_path CAPTCHA_training/faster_rcnn_inception_v2_coco.config --trained_checkpoint_prefix CAPTCHA_training_dir/model.ckpt-XXXX --output_directory CAPTCHA_inference_graph如果您正在为导出或使用推理图而苦苦挣扎,请下载我的代码并对其进行测试。因此,我不会详细介绍我的代码。我复制了另一个教程中的代码,并更改了几行以满足我的要求。如您所见,代码非常简短,只有很少的注释可以让您更清楚。因此,如果您想测试它在您的captcha图像上是否有效,请将此行更改为您的image:captcha_Detection(“11.jpg”),然后以这种方式运行它。如果您正在为导出或使用推理图而苦苦挣扎,请下载我的代码并对其进行测试。
# Welcome to the object detection tutorial !

# Imports
import cv2
import numpy as np
import os
import sys
# run on CPU
os.environ['CUDA_VISIBLE_DEVICES'] = '-1'
import tensorflow as tf
from distutils.version import StrictVersion
from collections import defaultdict

# title of our window
title = "CAPTCHA"

# Env setup
from object_detection.utils import ops as utils_ops
from object_detection.utils import label_map_util
from object_detection.utils import visualization_utils as vis_util


# Model preparation
PATH_TO_FROZEN_GRAPH = 'CAPTCHA_frozen_inference_graph_v2.pb'
# List of the strings that is used to add correct label for each box.
PATH_TO_LABELS = 'CAPTCHA_labelmap.pbtxt'
NUM_CLASSES = 37


# Load a (frozen) Tensorflow model into memory.
label_map = label_map_util.load_labelmap(PATH_TO_LABELS)
categories = label_map_util.convert_label_map_to_categories(label_map, max_num_classes=NUM_CLASSES, use_display_name=True)
category_index = label_map_util.create_category_index(categories)

detection_graph = tf.Graph()
with detection_graph.as_default():
    od_graph_def = tf.GraphDef()
    with tf.gfile.GFile(PATH_TO_FROZEN_GRAPH, 'rb') as fid:
        serialized_graph = fid.read()
        od_graph_def.ParseFromString(serialized_graph)
        tf.import_graph_def(od_graph_def, name='')


# Detection
def Captcha_detection(image):
    with detection_graph.as_default():
        with tf.Session(graph=detection_graph) as sess:
            # Open image
            image_np = cv2.imread(image)
            # To get real color we do this:
            image_np = cv2.cvtColor(image_np, cv2.COLOR_BGR2RGB)
            # Expand dimensions since the model expects images to have shape: [1, None, None, 3]
            image_np_expanded = np.expand_dims(image_np, axis=0)
            # Actual detection.
            image_tensor = detection_graph.get_tensor_by_name('image_tensor:0')
            boxes = detection_graph.get_tensor_by_name('detection_boxes:0')
            scores = detection_graph.get_tensor_by_name('detection_scores:0')
            classes = detection_graph.get_tensor_by_name('detection_classes:0')
            num_detections = detection_graph.get_tensor_by_name('num_detections:0')
            # Visualization of the results of a detection.
            (boxes, scores, classes, num_detections) = sess.run(
              [boxes, scores, classes, num_detections],
              feed_dict={image_tensor: image_np_expanded})
            vis_util.visualize_boxes_and_labels_on_image_array(
              image_np,
              np.squeeze(boxes),
              np.squeeze(classes).astype(np.int32),
              np.squeeze(scores),
              category_index,
              use_normalized_coordinates=True,
              line_thickness=2)
            # Show image with detection
            cv2.imshow(title, cv2.cvtColor(image_np, cv2.COLOR_BGR2RGB))
            #cv2.imwrite("Predicted_captcha.jpg", cv2.cvtColor(image_np, cv2.COLOR_BGR2RGB))

Captcha_detection("11.jpg")
在我的视频教程中,您可能看到我在几个验证码图像上测试了它。我解释了当模型可能在同一字母上看到两个不同的符号具有相似的检测百分比时可能出现的检测问题。在这种情况下,我们需要用过滤把它说出来。在本教程中,我不会详细解释这一点。更好的做法是让我们来享受CAPTCHA检测模型的乐趣,以测试它是如何工作的:
示例编号1
示例编号2
示例编号3
示例编号4
示例编号5
示例编号6
从我们的示例中,您可以看到我们的模型预测的符号接近100%,因此它将以这种方式工作,但有时我们可能面临更困难的验证码图像。为了避免这种情况,我们应该运行大量的测试来使它变得完美。因此,为了使我们的模型更好,我们能做的最好的事情就是编写一个脚本,尝试登录到某个需要验证码的网页。当我们无法登录时,我们会将验证码保存在某个地方。这样,我们就会知道我们的模型正在与之斗争,收集至少100种这种验证码,然后重新培训您的模型。您将看到您的检测率有了很大提高。
此外,在我的视频中,我谈到了过滤器。在示例Nr.4中,您可以看到我们的模型以不同的精度考虑了X和Y符号。这就是为什么我们需要过滤来检查真正隐藏在那里的是什么,有时我们可能会在另一个V符号上看到V符号,或者在C上看到G,或者类似的东西,这些东西对于我们的模型来说很难用过滤来解决这个问题。
本教程到此为止;这是一个简短但内容丰富的教程。下一个教程将是最终教程,在那里我们将完成验证码检测以过滤我们的检测,并给我们一个答案字符串。
最初发表于https://pylessons.com/TensorFlow-CAPTCHA-actual-detectionhttps://pylessons.com/TensorFlow-CAPTCHA-actual-detection
原创文章,作者:fendouai,如若转载,请注明出处:https://panchuang.net/2021/07/09/tensorflow%e9%aa%8c%e8%af%81%e7%a0%81%e8%a7%a3%e7%ae%97%e5%99%a8%e6%a3%80%e6%b5%8b%e6%95%99%e7%a8%8b-2/

