TensorFlow 一步一步实现卷积神经网络
本文是全系列中第13 / 23篇:TensorFlow 从入门到精通
- Tensorflow 介绍和安装
- 【干货】史上最全的Tensorflow学习资源汇总
- 文末福利|一文上手TensorFlow2.0(一)
- TensorFlow 卷积神经网络手写数字识别数据集介绍
- 特征工程
- 一文上手最新TensorFlow2.0系列(二)
- 深度学习之激活函数
- Tensorflow实现MNIST手写数字识别
- 一文上手Tensorflow2.0之tf.keras|三
- 卷积神经网络概述
- 损失函数综述
- 一文上手Tensorflow2.0(四)
- TensorFlow 一步一步实现卷积神经网络
- Tensorboard 详解(上篇)
- 深度学习发展史
- Tensorflow从入门到精通之——Tensorflow基本操作
- Tensorboard详解(下篇)
- 卷积的发展历程,原理和基于 TensorFlow 的实现
- 五大经典卷积神经网络介绍:LeNet / AlexNet / GoogLeNet / VGGNet/ ResNet
- TensorFlow 多GPU使用详解
- 一文彻底搞懂BP算法:原理推导+数据演示+项目实战(上篇)
- TensorFlow 实战卷积神经网络之 LeNet
- 深度学习之视频人脸识别系列二:人脸检测与对齐
TensorFlow 从入门到精通系列教程:
http://www.tensorflownews.com/series/tensorflow-tutorial/
卷积层简单封装
# 池化操作
def conv2d(x, W, b, strides=1):
    # Conv2D wrapper, with bias and relu activation
    x = tf.nn.conv2d(x, W, strides=[1, strides, strides, 1], padding='SAME')
    x = tf.nn.bias_add(x, b)
    return tf.nn.relu(x)
TensorFlow max_pool 函数介绍:
tf.nn.max_pool(x, ksize, strides ,padding)
参数 x:
和 conv2d 的参数 x 相同,是一个 4 维张量,每一个维度分别代表 batch,in_height,in_height,in_channels。
参数 ksize:
池化核的大小,是一个 1 维长度为 4 的张量,对应参数 x 的 4 个维度上的池化大小。
参数 strides:
1 维长度为 4 的张量,对应参数 x 的 4 个维度上的步长。
参数 padding:
边缘填充方式,主要是 “SAME”, “VALID”,一般使用 “SAME”。
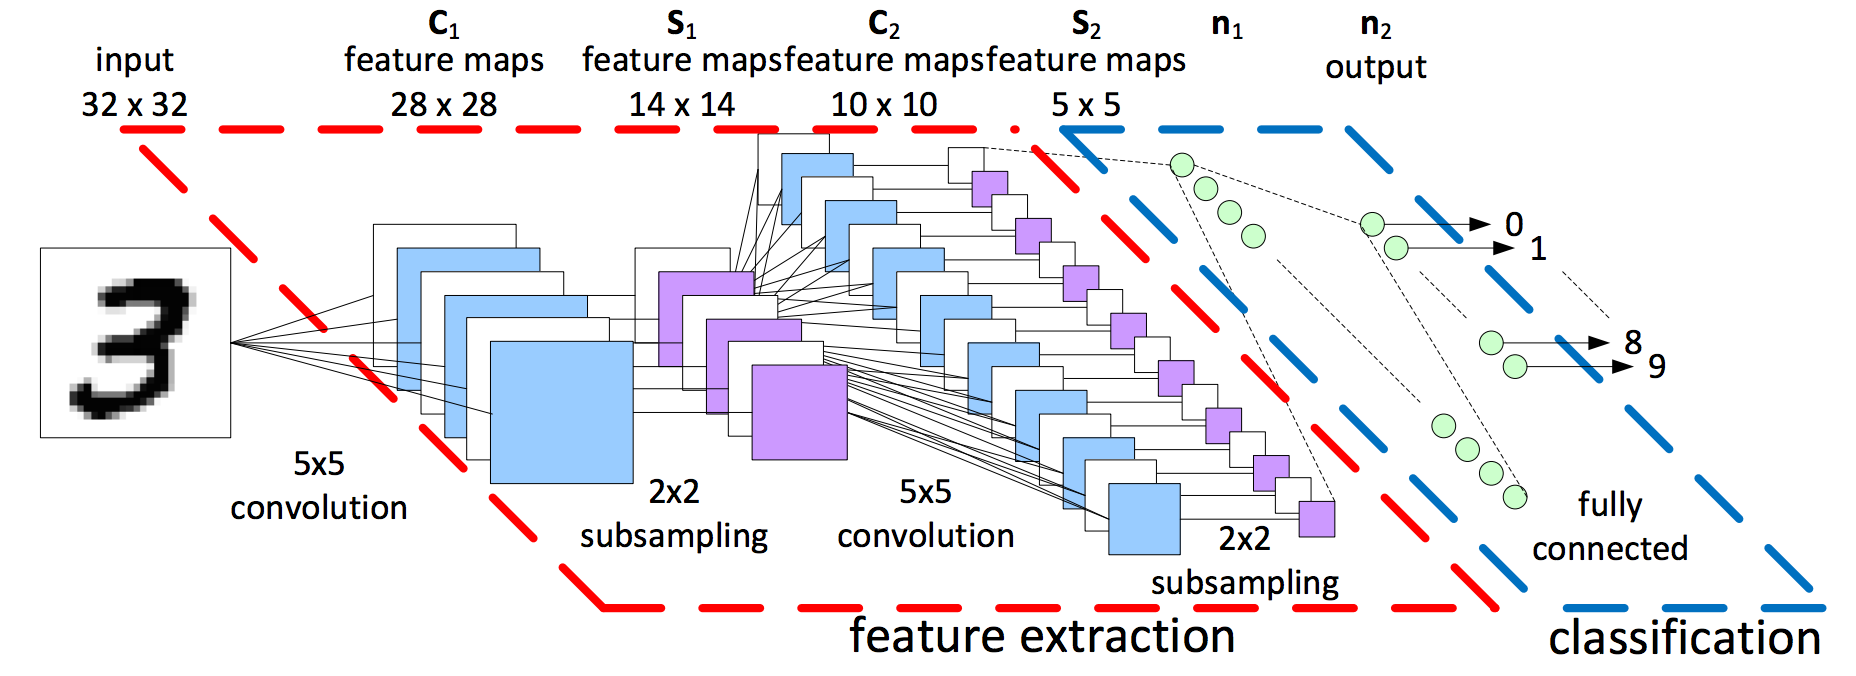
接下来将会使用 TensorFlow 实现以下结构的卷积神经网络:

卷积层简单封装
def maxpool2d(x, k=2):
    # MaxPool2D wrapper
    return tf.nn.max_pool(x, ksize=[1, k, k, 1], strides=[1, k, k, 1],padding='SAME')
卷积神经网络函数
超参数定义:
# 训练参数
learning_rate = 0.001
num_steps = 200
batch_size = 128
display_step = 10

# 网络参数
#MNIST 数据维度
num_input = 784
#MNIST 列标数量
num_classes = 10
#神经元保留率
dropout = 0.75
卷积神经网络定义:
# 卷积神经网络
def conv_net(x, weights, biases, dropout):
    x = tf.reshape(x, shape=[-1, 28, 28, 1])
    # 第一层卷积
    conv1 = conv2d(x, weights['wc1'], biases['bc1'])
    # 第二层池化
    conv1 = maxpool2d(conv1, k=2)

    # 第三层卷积
    conv2 = conv2d(conv1, weights['wc2'], biases['bc2'])
    # 第四层池化
    conv2 = maxpool2d(conv2, k=2)

    #全连接层
    fc1 = tf.reshape(conv2, [-1, weights['wd1'].get_shape().as_list()[0]])
    fc1 = tf.add(tf.matmul(fc1, weights['wd1']), biases['bd1'])
    fc1 = tf.nn.relu(fc1)
    #丢弃
    fc1 = tf.nn.dropout(fc1, dropout)

    #输出层,输出最后的结果
    out = tf.add(tf.matmul(fc1, weights['out']), biases['out'])
    return out
效果评估
#softmax 层
logits = conv_net(X, weights, biases, keep_prob)
prediction = tf.nn.softmax(logits)

#定义损失函数
loss_op = tf.reduce_mean(tf.nn.softmax_cross_entropy_with_logits(
    logits=logits, labels=Y))
#定义优化函数
optimizer = tf.train.AdamOptimizer(learning_rate=learning_rate)
#确定优化目标
train_op = optimizer.minimize(loss_op)


#获得预测正确的结果
correct_pred = tf.equal(tf.argmax(prediction, 1), tf.argmax(Y, 1))
#求准确率
accuracy = tf.reduce_mean(tf.cast(correct_pred, tf.float32))
训练过程输出
Step 1, Minibatch Loss= 92463.1406, Training Accuracy= 0.117
Step 10, Minibatch Loss= 28023.7285, Training Accuracy= 0.203
Step 20, Minibatch Loss= 13119.1172, Training Accuracy= 0.508
Step 30, Minibatch Loss= 5153.5215, Training Accuracy= 0.719
Step 40, Minibatch Loss= 4394.2578, Training Accuracy= 0.750
Step 50, Minibatch Loss= 4201.6006, Training Accuracy= 0.734
Step 60, Minibatch Loss= 2271.7676, Training Accuracy= 0.820
Step 70, Minibatch Loss= 2406.0142, Training Accuracy= 0.836
Step 80, Minibatch Loss= 3353.5925, Training Accuracy= 0.836
Step 90, Minibatch Loss= 1519.4861, Training Accuracy= 0.914
Step 100, Minibatch Loss= 1908.3972, Training Accuracy= 0.883
Step 110, Minibatch Loss= 2853.9766, Training Accuracy= 0.852
Step 120, Minibatch Loss= 2722.6582, Training Accuracy= 0.844
Step 130, Minibatch Loss= 1433.3765, Training Accuracy= 0.891
Step 140, Minibatch Loss= 3010.4907, Training Accuracy= 0.859
Step 150, Minibatch Loss= 1436.4202, Training Accuracy= 0.922
Step 160, Minibatch Loss= 791.8259, Training Accuracy= 0.938
Step 170, Minibatch Loss= 596.7582, Training Accuracy= 0.930
Step 180, Minibatch Loss= 2496.4136, Training Accuracy= 0.906
Step 190, Minibatch Loss= 1081.5593, Training Accuracy= 0.914
Step 200, Minibatch Loss= 783.2731, Training Accuracy= 0.930
Optimization Finished!
Testing Accuracy: 0.925781
模型优化
经典卷积神经网络
图像分类实战项目
The CIFAR-10 dataset
https://www.cs.toronto.edu/~kriz/cifar.html
目标检测实战项目
Tensorflow Object Detection API
https://github.com/tensorflow/models/tree/master/research/object_detection
主要参考对象:
1.TensorFlow 官方介绍
Image Recognition
https://tensorflow.google.cn/tutorials/image_recognition
https://www.tensorflow.org/tutorials/deep_cnn
2.最经典论文
ImageNet Classification with Deep Convolutional Neural Networks
http://papers.nips.cc/paper/4824-imagenet-classification-with-deep-convolutional-neural-networks
3.最经典课程
Convolutional Neural Networks
http://cs231n.github.io/convolutional-networks/Deep learning
http://neuralnetworksanddeeplearning.com/chap6.html
3.Wikipedia
Convolutional neural network
https://en.wikipedia.org/wiki/Convolutional_neural_network
4.Good tutorial
Comparison of Normal Neural network
https://leonardoaraujosantos.gitbooks.io/artificial-inteligence/content/convolutional_neural_networks.html
Convolutional Neural Networks (LeNet)
http://deeplearning.net/tutorial/lenet.html#sparse-connectivity
Convolutional neural networks from scratch
http://gluon.mxnet.io/chapter04_convolutional-neural-networks/cnn-scratch.html
卷积神经网络
http://prors.readthedocs.io/zh_CN/latest/2ndPart/Chapter8.SceneClassification/ConvNet.html
ImageNet Classification with Deep Convolutional
Neural Networks
https://papers.nips.cc/paper/4824-imagenet-classification-with-deep-convolutional-neural-networks.pdf
原创文章,作者:fendouai,如若转载,请注明出处:https://panchuang.net/2018/03/27/tensorflow-step-by-step-cnn/

